
In my previous post, I wrote about the new login system we're working on for Webmaker. In short, the new system facilitates the authentication of a user by generating a one time use password and sending it to the user's email account. The user can then click a link in the email to log them in right away (either for the session only or for one year).
After getting some great feedback about my last post, I'm going to try and outline the protocol with less noise and more of the important details.
What's new
The latest implementation of the system adds in several things that weren't in the previous iteration.
Most notably, we've chosen to provide users with the option to disable one time passwords and use a custom set password. You can read more about how these are implemented in the Protocol section below.
Secondly, I've updated the OTP generation process to create ten character, pronounceable tokens. This new method aids users if they need to type the token on one device, while reading from another.
Lastly, I have put in rate limiting middleware on the login server routes that handle the new protocol. It is backed by redis, and provides a simple way to control how often someone can use the routes.
Here's how it works:
- A request comes in!
- Data about rate limits is stored in redis, keyed on
"{API_route}:{IP_Address}:{uid}". The middleware queries redis to see if this IP and uid have been here recently, and if so, increments the hit count OR The rate limiting middleware stores the hit count(1) in redis, using the key pattern described, and the key is set to expire after some amount of time. - Should further requests be made from the same source, the count stored in the key is incremented
- If the count in the key reaches some max value before it expires, any further requests get a 429 response from the API server (until the key expires).
High Level Overview
I've put together four high level flow charts that show the new actions in the system. For more detail about the actions, read the Protocol section below.
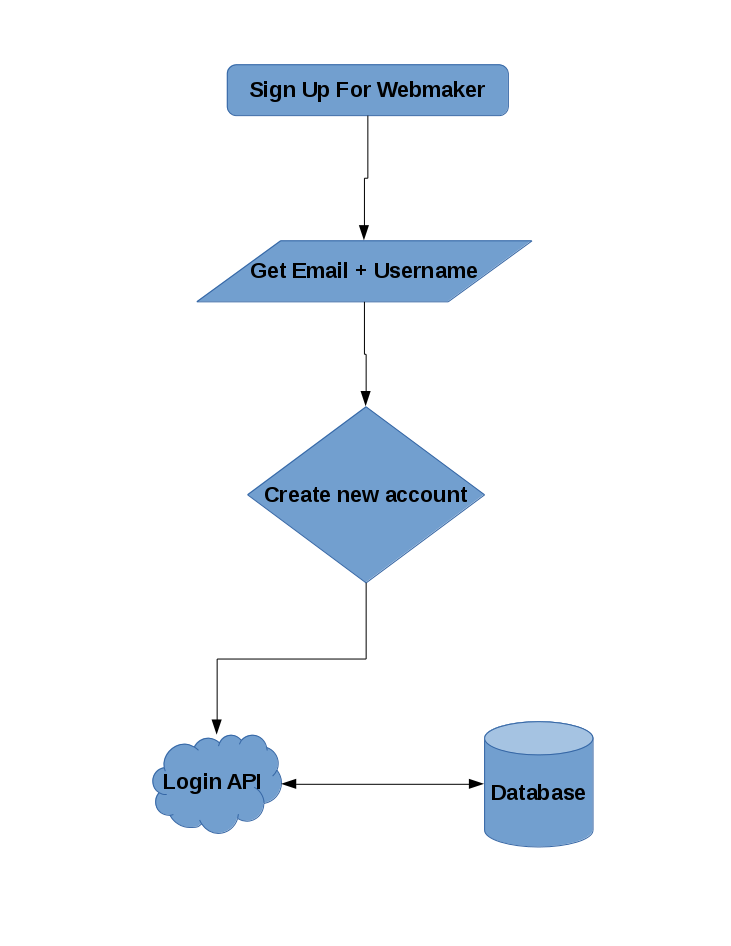
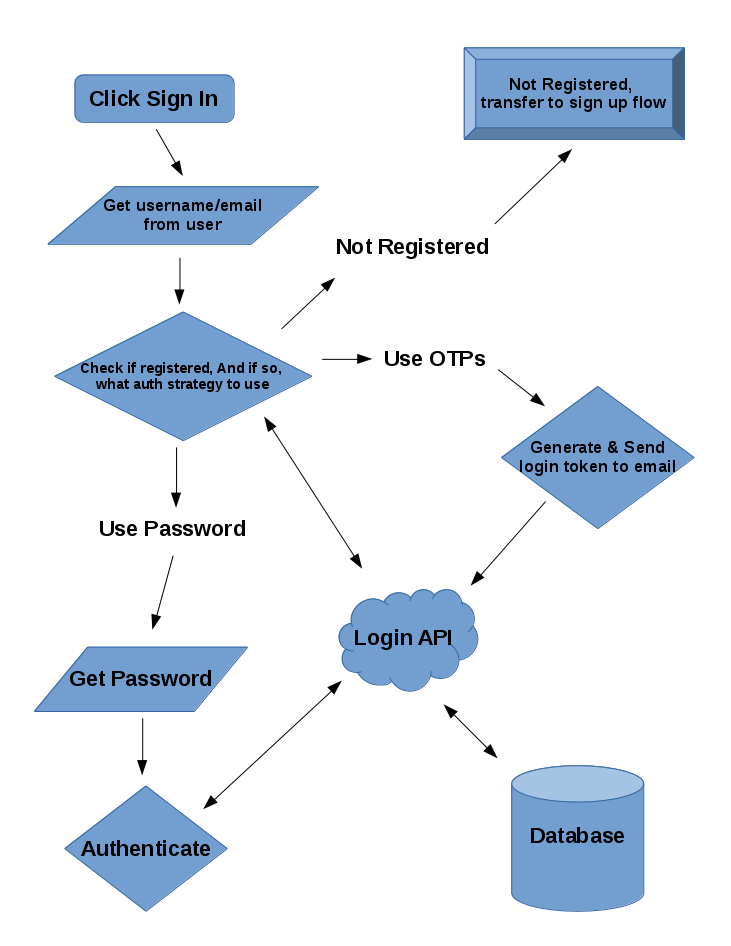
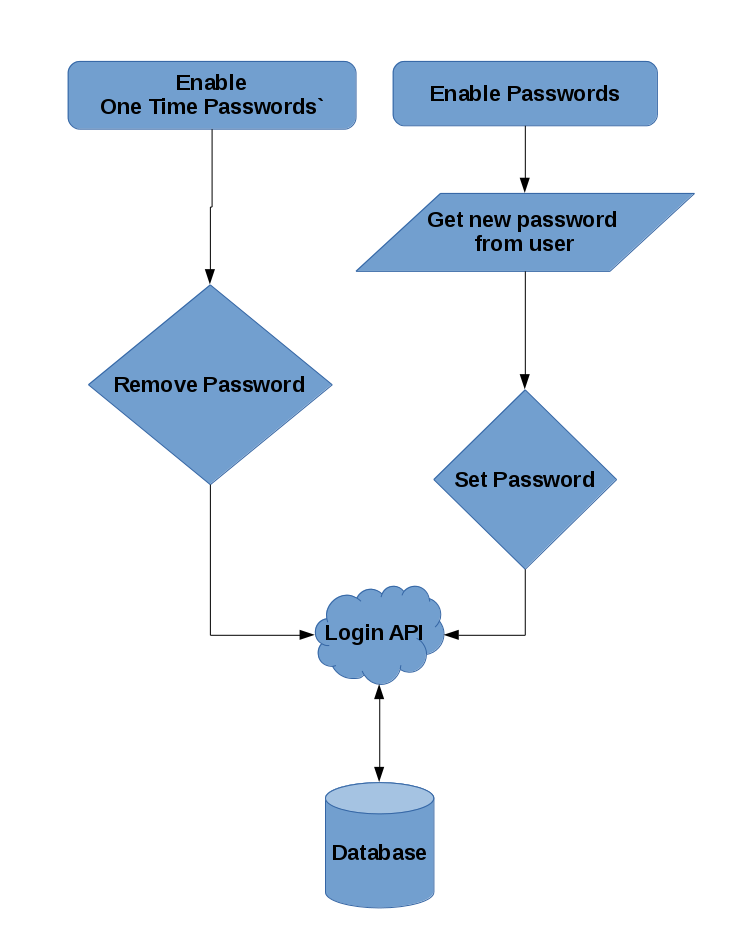
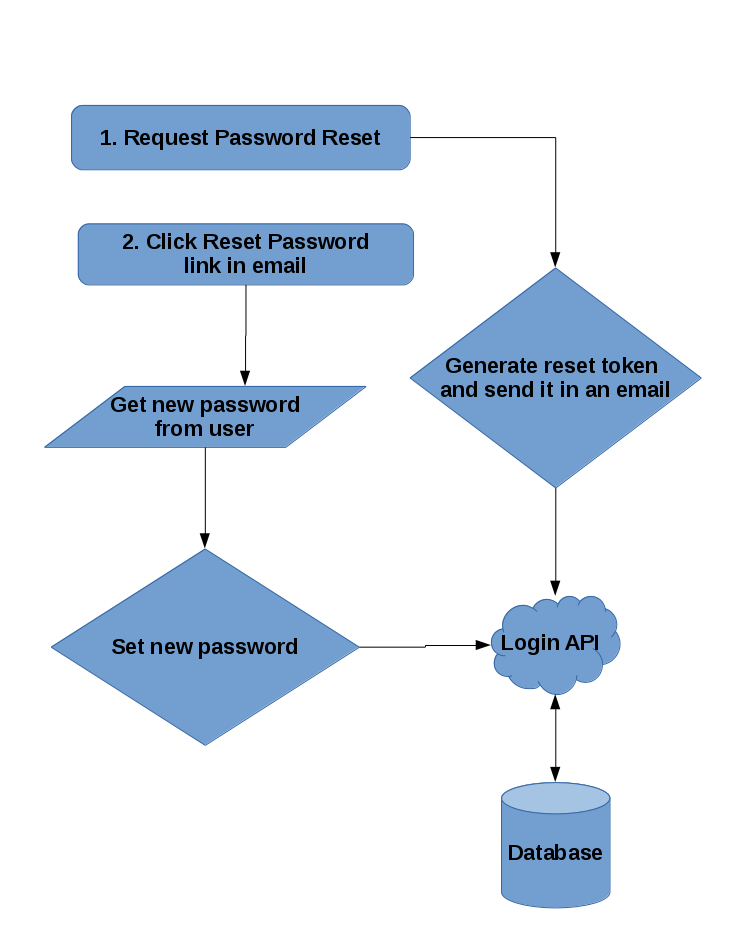
Protocol
Creating a token
- A request is made to
/api/v2/user/requestwith a JSON post body containing a uid (username or email) - The server generates 4 random bytes using node's crypto.randomBytes function
- A module called proquint turns the random bytes into a pronouncable string, i.e: "joban-ladim"
- The string is stored in the database, and an login email is dispatched
Sign in with Token
- The user enters clicks a link in a login email. The link includes the following query parameters:
- username=<username>
- token=<OTP>
- validFor=<'session' or 'one-year'>
- The page issues a post request to
/api/v2/user/authenticateTokenwith the query params as JSON in the body - The token is verified, and marked as used.
- The server sends a set-cookie header in the response to the client, that either expires when the browser session ends (public/shared computers), or one that will not expire for one year (for trusted computers)
Sign in with Password
- The user enters in their uid (email or username) and their password, which are posted to
/api/v2/user/verify-password - The server looks up the user's salted and hashed password, and verifies that the provided password produces the same output from bcrypt
- The server sends a set-cookie header containing the user's session object, which can expire after the session or in one year.
Enable Passwords
- A logged in user provides a unique, secure password (ideally) which is send in to
api/v2/user/enable-passwordsin the post body. - The server uses bcrypt to salt and hash the password (12 rounds, to slow things down a bit)
- The salt and hash are stored in the database
Disable Passwords
- A logged in user causes the site to post to
/api/v2/user/remove-password - The user's password is removed from the database, enabling OTP for the user once again.
Reset Password Request
- A user provides a uid (email or username) which is posted to
/api/v2/user/request-reset-code - The server uses Hat to generate 256 random bits, which is base 16 encoded, creating a 64 character long string.
- The string is saved to the database and an email is dispatched to the account owner.
Reset Password
- A user clicks the reset password link in a reset request email, which links to something like
/reset-account?uid={username}&code={reset_code} - The user enters a unique, secure password (every time, right?)
- The code, uid, and password are posted to
/api/v2/user/reset-password - The reset code is validated
- The same steps described above are followed to salt and hash the password, which is then stored in the database.
Wrap-up
The system we've been working on is an effort to make the sign up and sign on experience on Webmaker easier for our users. We think we've nailed it with the dead-easy sign up flow. However, getting sign in to not suck isn't as easy. As we roll out the new system in the near future, we're going to be watching closely and gathering data about the various ways people interact with the new system. This data will help inform our decisions moving forward as we try to make the Webmaker experience better for everyone.
If you've made it this far, congratulations! Do you have an opinon on the new system? We'd love to hear from you! There are many ways to get in touch:
- Use the Disqus comments at the end of this post
- Tweet @ me
- Come talk to us in IRC - irc://irc.mozilla.org/#webmaker (I'm "cade")